//

Saturday, September 23, 2023

Effective Branching Strategies in Development Teams

Effective Branching Strategies in Development Teams

Effective Branching Strategies in Development Teams

Introduction

In a development environment, deciding on a suitable branching strategy is crucial. It enables teams to determine the codes running in production, reproduce bugs occurring in production, and manage commits for upcoming features or immediate production deployments. It’s a collective decision, tailored to suit the team's workflow and demands. Before diving deep into strategies, it's essential to understand branches in Git, which are pointers to a commit.

Branching Strategies

  • Branch Types
    • Main Branch: All commits here are either in production or about to be deployed soon.
    • Feature Branches: For new features, branching from the tip of the main, continually committed to until feature completion.
    • Hotfix Branches: Created from the main branch for immediate production deployments to fix issues in production.
  • Commit Management

    When working on features taking several weeks, commits shouldn’t be included in any upcoming production deployments, and solutions should scale to multiple engineers working on multiple features.

  • Approach to Production Deployment

    After feature completion, commits are merged into the main branch through pull requests in CodeCommit, reviewed, and commented on by the team before being ready for deployment. Commits can be merged using Fast forward merge, Squash and merge, or 3-way merge, according to which suits the situation best.

  • CI/CD Integration

    Continuous Integration and Continuous Deployment (CI/CD) aid in testing code quality, deploying to staging environments, and eventually to production after the merger. It’s instrumental for both feature deployments and hotfix requirements.

Handling Merge Conflicts

When multiple individuals are merging to main, conflicts could occur, needing resolution by selecting from the overlapping changes. Continuous pushing of commits to the source branch is possible while the pull request is open, and it updates the pull request accordingly.

Hotfix Requirements

For issues found in production, such as security vulnerabilities, hotfix branches are created from the main branch, and after necessary fixes and thorough testing, they are merged back to main, and CI/CD deploys the hotfix.

Dealing with Diverged Branches

For branches diverged far from the main due to prolonged work on a feature, bringing the commits from the main into the feature branch by merging or rebasing is necessary. This may involve resolving merge conflicts and careful handling as it could rewrite history and impact those working on the same feature branch.

Conclusions

Branching is integral for effective development cycles, and the choice of strategy depends heavily on the team’s preferences, working style, and project requirements. Git offers powerful tools and options, making work with branching strategies intuitive over time.

Team Decisions and Collaborations

In every step, whether it’s allowing force push or resolving conflicts, the team’s collective decisions are crucial. Regular collaboration and communication among team members during pull requests and merges ensure smooth and efficient workflow, enhancing overall productivity.

Final Thoughts

The ideal branching strategy and related decisions are not one-size-fits-all and will depend on the team's specific needs, workflow, and the nature of the projects. It is crucial to have a clear understanding of Git functionalities and regular team interactions to choose and implement the most effective strategies, ensuring seamless and productive development cycles.

The described process not only aids in feature improvements and updates but also significantly contributes to resolving unforeseen production issues promptly and maintaining the security and integrity of applications. Keep exploring and adapting to find what works best for your team.
Wednesday, August 2, 2023

Intro Rust for C++ programmers

An In-Depth Introduction to Rust for C++ Developers

This post dives deeper into Rust by covering specific language features and comparing them to similar concepts in C++.

Motivation

There are several reasons why C++ developers may want to look into Rust:

  • Tooling - Rust has excellent built-in tooling like Cargo, which makes creating, building and distributing projects much easier compared to C++. Cargo handles building, testing, dependency management, packaging etc in a standard way.
  • Safety - Rust's ownership and borrowing system helps prevent memory errors and dangling pointers at compile time. The compiler ensures memory safety.
  • Performance - Rust has performance comparable to C++ without requiring manual memory management.
  • Modern language - Rust incorporates lessons learned from other languages with a focus on productivity, reliability, and performance. The language and tooling is designed to be very ergonomic and promote good practices.

Syntax and Mutability

Rust and C++ have relatively similar syntax for basic things like functions, variables, and control flow:


int add(int x, int y) { // C++ function
  return x + y; 
}

int main() {
  int a = 5; // immutable by default
  int b = 10;
  int result = add(a, b); 
  
  std::cout << result; // print output
}

fn add(x: i32, y: i32) -> i32 { // Rust function
  x + y // no semicolon needed  
}

fn main() {
  let a = 5; // immutable by default
  let b = 10;
  
  let result = add(a, b); // call add function
  
  println!("{}", result); // print macro
}

Some key differences:

  • Rust uses fn instead of C++'s int to define functions.
  • Variables are immutable by default in Rust. mut keyword is required to make something mutable.
  • Semicolons are optional for expressions in Rust.
  • Rust has built-in macros like println!

Rust also has support for constants with the const keyword, similar to constexpr in modern C++:


const PI: f32 = 3.141592; // typed constant

Ownership and Borrowing

A key difference between Rust and C++ is Rust's ownership and borrowing system. Some key rules:

  • Each value has a variable that is its owner.
  • There can only be one owner at a time.
  • When the owner goes out of scope, the value will be dropped.
  • At any time, you can have either one mutable reference or any number of immutable references.
  • References must always be valid.

This allows Rust to prevent dangling pointers, double frees, and data races at compile time.

For example:


let s = String::from("hello"); // s owns this string

let r1 = &s; // immutable borrow of s
let r2 = &s; // immutable borrow  
println!("{} and {}", r1, r2); // use the borrows

let r3 = &mut s; // mutable borrow
println!("{}", r3);

This works because the borrows don't overlap. s is borrowed immutably, then borrowed mutably after the immutable borrows end. The compiler tracks this.

Constants

Rust has constant values similar to const in C++:


const int MAX = 100; 

const MAX: i32 = 100;

Constants can be primitives or the result of a constant expression.

Variables and References

Variables are immutable by default in Rust:


let x = 10;

To make them mutable, use mut:


let mut x = 10;
x = 15; 

References in Rust are like C++ references:


int x = 10;
int& rx = x; // reference

let x = 10;
let rx = &x;

Lifetimes

Rust uses lifetimes to ensure references are valid - they live at least as long as the data they refer to.


// 'a is a lifetime
fn print_ref<'a>(x: &'a i32) {
  println!("{}", x); 
}

fn main() {
  let x = 10;
  
  print_ref(&x); // 'x lifetime is valid
}

Lifetimes are usually implicit and inferred automatically.

Copy Semantics

For simple types like integers, Rust copies them by default like C++:


int x = 10;
int y = x; // copies x

let x = 10;
let y = x; // copies

For non-primitive types, Rust moves by default.

Move Semantics

Rust has move semantics similar to C++ moves:


std::string s1 = "Hello";
std::string s2 = std::move(s1); // moves s1

let s1 = String::from("Hello");  
let s2 = s1; // moves s1

But Rust moves are destructive - the old variable can no longer be used.

Expressions

Rust has expression-based control flow like if and loop:


let x = if true { 1 } else { 0 }; // if expression

let y = loop { // loop expression
  counter += 1;
  if counter == 10 {
    break counter;
  }
};

The result of the block is the result of the expression.

Structs

Structs are similar to C++:


struct Point {
  int x;
  int y;  
};
  
struct Point {
  x: i32,
  y: i32,
}

Rust struct fields are immutable by default.

Methods

Methods are defined within impl blocks:


struct Circle {
  radius: f32, 
}

impl Circle {
  fn area(&self) -> f32 {
    std::f32::consts::PI * (self.radius * self.radius)
  }
}

Vectors

Vectors are resizeable arrays like std::vector in C++:


std::vector<int> v = {1, 2, 3};
v.push_back(4);
  
let mut v = vec![1, 2, 3];
v.push(4);

Slices

Slices are views into sequences like std::span in C++:


std::vector v = {1, 2, 3};
auto s = std::span(v); // slice

let v = vec![1, 2, 3];
let s = &v[..]; // slice

Here is a markdown section comparing traits in Rust and C++17/20:

Traits

Traits in Rust are similar to type classes in Haskell or concepts in C++20. They define shared behavior that types can implement.

For example, we can define a Shape trait:

  
trait Shape {
  fn area(&self) -> f32; 
}

This is like a C++ concept:


template<typename T>
concept Shape = requires(T t) {
  { t.area() } -> std::same_as<float>;
};

Now we can implement the trait/concept for a type:


struct Circle {
  radius: f32
}

impl Shape for Circle {
  fn area(&self) -> f32 {
    std::f32::consts::PI * (self.radius * self.radius)
  }
}
  
struct Circle {
  float radius;
  
  float area() {
    return std::numbers::pi * (radius * radius); 
  }
};

And use trait bounds to write generic code:


fn print_area<T: Shape>(shape: &T) {
  println!("{}", shape.area()); 
}

template<Shape T>  
void print_area(const T& shape) {
  std::cout << shape.area() << std::endl;
}

Some key differences between Rust traits and C++ concepts:

  • Traits are defined separately from implementations, concepts are defined together with concrete types.
  • Rust has inherent impls to provide implementations for a concrete type.
  • Traits allow multiple dispatch - calling a method based on the dynamic types of multiple arguments.
  • Trait objects enable dynamic polymorphism at runtime like C++ virtual functions.

Overall, Rust's trait system provides behavior sharing like interfaces in other languages, while still having zero-cost abstractions through compile-time static checking as in C++ generics.

Enums

Rust enums are more powerful than C++ enums:


enum Message {
  Quit,
  Move{x: i32, y: i32}, // struct-like
  ChangeColor(i32, i32, i32), // tuple-like
}

Pattern Matching

Pattern matching via match is used to match on enums:


fn process_message(msg: Message) {
  match msg {
    Message::Quit => ..., 
    Message::Move{x, y} => ...,
    Message::ChangeColor(r, g, b) => ...
  }
}

Option

Option<T> is an enum for possibly missing values:


enum Option<T> {
  Some(T),
  None,
}

let x: Option<i32> = Some(5);
let y: Option<i32> = None;

Error Handling

Rust has robust error handling built-in similar to std::expected<T> in C++17:


enum Result<T, E> {
  Ok(T),
  Err(E), 
}

This Result type is used pervasively in Rust for returning errors:


use std::fs::File;

fn read_file(path: &str) -> Result<File, std::io::Error> {
  let f = File::open(path); // returns a Result
  f // return the Result
} 

The ? operator provides a concise way to handle errors:


fn read_file(path: &str) -> Result<File, std::io::Error> {
  let f = File::open(path)?; // handle error

  Ok(f) // return Ok value
}

Much more ergonomic than error handling in C++.

Iterators

Rust has iterators for lazy sequences:


struct Counter {
  count: u32, 
}

impl Iterator for Counter {
  type Item = u32;

  fn next(&mut self) -> Option<Self::Item> {
    // increment counter
    if self.count < 5 {
      Some(self.count) 
    } else {
      None
    }
  }
} 

This allows use with for loops, LINQ-style methods like map and filter, etc.

Thursday, August 27, 2020

Calling the server

 Introducing Ajax

Making calls to the server

Typically, when we make a call to the server, we need to refresh the entire page. Not only can this impact performance, it can change our user's perception of our pages. In addition, as developers, we'd like to be able to incorporate server-side resources into our pages, allowing us to update individual portions of the page with new data, rather than updating the entire page. This is where the XmlHttpRequest object comes into play and, Ajax.

Asynchronous JavaScript and XML (Ajax)

Ajax is a set of technologies that act together to make it easier for us as developers to make calls to server resources from JavaScript. Breaking down the three words that make up the acronym, you'll notice we have asynchronous (which jQuery simplifies through the use of promises), JavaScript (which we already know), and XML. XML is probably the one that doesn't fit, as XML is typically not a preferred mechanism for serialization. As we've seen, we typically want to use JSON, as its more compact and native to JavaScript.
Basic data retrieval

The most basic Ajax operation we can perform using jQuery is get. get contacts the URL we provide, and passes the string the server returns into the parameter we'll use for our event handler. get accepts multiple parameters, but the two you'll most commonly use are the URL you wish to call, and an event handler that will be executed on success.

$.get(
    'some-url', // The URL to call
    function(data) { // Success event handler
        // The data parameter contains the string
        $('#output').text(data);
    }
);


jQuery Ajax and promises

All jQuery Ajax calls return a jQuery promise. This means you can use done for your success event handler, and fail to catch any errors. The two code samples perform the same operations.

// Option one (pass the success function as a parameter)
$.get('some-url', function(data) { $('#output').text(data); });

// Option two (use the done function of the promise)
$.get('some-url').done(function(data) { $('#output').text(data); });
As we've discussed, JavaScript offers native support for serialization to and from JSON. jQuery builds on top of that, allowing you to easily retrieve JSON objects from the server by using getJSON.


getJSON

To retrieve a JSON object, you can use getJSON. getJSON accepts several parameters, but the most common two that you'll provide are the URL you need to call, and an event handler for success. Just as we discussed with get, getJSON returns a promise, meaning you can use done and fail as an alternative.

Because getJSON is expecting JSON data, it automatically deserializes the object, meaning you do not need to call JSON.parse.

If you were calling a server that was going to return a Person object, with properties of firstName and lastName, you could use the sample code below.


$.getJSON('/api/Demo', function (person) {
    $('#first-name').val(person.firstName);
    $('#last-name').val(person.lastName);
});

Making server calls

At this point, if you're new to making server calls through JavaScript or other technologies, you might have a few questions about how you're supposed to know where the data is, what URLs you should use, etc. The answer is, well, it depends.

Finding the right URL

Probably the most common question I get as an instructor is, "How do I know where to go find data?" Fortunately this is a much easier question to answer than it seems, and it's in the form of a question, "What do you want to do?"

When you're trying to discover services that you can call, approach it like you would a user. For example, if I asked you, "Where do you go to track a package shipment?", you would give me a couple of sites I could use. Or, if I asked, "Where do you go to find out sports scores?", you would give me a couple of different sites.

You start by determining what data you need, and then starting your investigation that way. When you find a service that offers the necessary data, they will provide documentation, containing the URLs you need to call to obtain specific types of data, what the data will look like, etc. They'll often provide a sandbox as well that you can use to practice and play.

Most commonly you'll be calling your own server and accessing your own organization's data. Then the answer becomes even easier: talk to the developer who created the server side code that you need to call. They can provide all of the information you need.

To get technical

When we start digging into making server calls, retrieving and uploading data, things can get a bit confusing pretty quickly. You may have some questions about how things work behind the scenes. Below you'll find some basic information about various standards and how to use them. However, a full discussion on REST and other APIs is beyond the scope of the course.
Verbs

As we discussed in the prior module, HTTP offers several "verbs", with the two most common being GET and POST. Those two names can cause some confusion, as they both have meanings in English. Get of course means to retrieve something, and post means to put something somewhere. Unfortunately, from a technical sense, that is not what GET and POST mean when they're related to HTTP.

GET and POST in HTTP terms are about how to send data to the server, not a determination of the server sending you data. The server will always send you data, be it a status code, string data, or a JSON object. GET and POST determine how we as the caller are going to send data to the server.

GET limits us to sending data in the URL only. Because the data can only be in the URL, we are not only restricted in the amount of data we're able to send, but in the data types. Large amounts of data cannot be sent in the URL.

POST on the other hand allows us to send data both in the URL, but also in what's known as the header. The header is information that's sent behind the scenes from the client to the server, and can be used to send almost any type of data, including binary data.

But, and I want to repeat this, both GET and POST return data. The difference between the two is how we're allowed to send data to the server.

HTTP and REST APIs

As we discussed above, if you want to access data on a particular service, and need to figure out how to send data, what URLs to use, what data you're able to send, and what data will be sent to you, you'll want to check the documentation provided by the service.

Needless to say, that can get a bit overwhelming, as anyone who is implementing a service can create their own API. Each API can be completely different than any other API that's been implemented. To try and provide some consistency, some standards have been set around HTTP calls.

The most common set of rules is in working with data. HTTP provides several verbs, including GET, POST, PUT and DELETE. Many servers perform specific operations behind the scenes based on the verb that you use. GET will retrieve objects, POST will create a new object, PUT will update an existing object, and DELETE will delete an object.

Building upon those common operations, the W3C has established a specification called REST. REST provides for various standards to provide even more consistency when making server calls.

The big thing to remember is nobody is obligated to follow any of these standards. You will find that most services will make good faith efforts to abide by the guidelines set forth by REST, but there may be differences in their implementations.


Posting data

If the service you're using follows standard REST practices, you'll notice that you can create a new object by calling POST. Or, if you're trying to upload a binary object, such as an image, you're forced to use POST, as GET won't allow that type of data to be uploaded.

post
jQuery's post funtion uploads the data you provide by using the HTTP POST verb. Like getJSON, it also passes the JSON object returned by the server into the parameter for the event handler. And, just like all of the Ajax calls we've seen, post also returns a promise.

Because jQuery is aware of the fact we're probably going to use JSON, you'll notice there is no need to call JSON.stringify or JSON.parse; jQuery handles that automatically for us.

// get the data we need to send
var person = { firstName: 'Christopher', lastName: 'Harrison' };

// Call POST

$.post('URL', // Pass in the URL you need to access
    person, // Pass in the data to send via POST
    function(data) {
        // success event handler
        // parameter contains value returned by server
    }
);
 

Ajax events

When making Ajax calls, you may need to update page content or change the availability of controls such as buttons when calls start or complete. jQuery Ajax offers several global events.

Start events

The two starting events are ajaxStart and ajaxSend. ajaxStart is raised when the first Ajax call is being made. ajaxSend is raised each time an Ajax call is made.

Completion events

jQuery Ajax offers two main events when each Ajax call is finished, ajaxSuccess, which is raised when a call succeeds, and ajaxError, which is raised when a call fails.
ajaxComplete is raised when each Ajax call completes, regardless of success or failure. ajaxStop is raised when all calls are completed.

$(document).ajaxSend(function () {
 // raised when a call starts
 $('#status').append('<div>Call started</div>');
}).ajaxComplete(function () {
 // raised when a call completes
 $('#status').append('<div>Call completed</div>');
});
 

Dynamically Loading Data 

Up until now, everything that we've seen has been about sending and retrieving objects, or basic strings. But what if we want to load HTML or JavaScript dynamically. Fortunately, jQuery provides those capabilities as well.  

Loading HTML

load will call the URL provided, obtain the HTML, and place it in the targeted item.
$('#target').load('some-url.html');

Loading and executing JavaScript

If you need to load a JavaScript file dynamically, you can use getScript. One important note about getScript is it downloads and executes the script when it's called.
$.getScript('some-url.js');


Wednesday, December 18, 2019

Simple introduction to CSS

Why CSS

Cascading Style Sheets (CSS) is a language that controls and allows one to define the look of an HTML document. It permits the separation between the content of the HTML document from the style of the HTML file. CSS enables one to specify things such as the font you want on your page, the size of your text, the columns of the page, whether the text on a page is to be in bold or italics, background, link colors, margins, and placement of objects on a page and so on. by way of explanation, it is the part that controls the looks of a web page. With CSS, it is much easier to manage the appearance of multiple web pages since it separates the HTML element from display information. CSS also enables faster downloading of web pages, which is works best with older computers and modems. It provides a method for retaining a common style.

The coding of CSS style rules can be done in three places, namely:


  • Inline - done in the HTML tag.


  • Internal Style Sheet - coded at the beginning of a HTML document i.e. inside the <head></head> tags, and closed by the <style type=“text/css”> </style> tags.

  • External Style Sheet - this is a separate file with a .css extension which serves as a reference for multiple HTML pages with a path/link in the HTML pages pointing to browsers where to look for the styles.

CSS Syntax


CSS has two parts to a style rule.

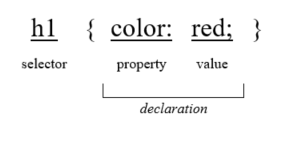
  • CSS selectors- this is the core foundation of CSS since it defines the HTML element being manipulated with the CSS code.
  • The declaration- consists of one or more property (is the CSS element being manipulated) value (represents the value of the specified property) pairs, usually ends in a semi-colon and enclosed in curly brackets. For example,
CSS Syntax

Usage Example:


<head>
    <title>HTML Page</title>
    <link rel="stylesheet" href="css/style.css" />
</head>
Ref:
  1. Microsoft: DEV211.1x: JavaScript, HTML and CSS Web Development

Sunday, September 15, 2019

Using deferred

Returning promises


Returning promises

If you are creating a long running function, you can return a promise, allowing the caller to be alerted to your operations status, or when it completes. You return, and manage, a promise by creating an instance Deferred.

Deferred

Deferred and promise seem very similar, and they are. The difference between the two is who uses which. Deferred is used to create, and manage, a promise object. A promise object is returned by a long running operation, and only allows you to register event handlers.
To put this another way, Deferred is the server side. When create a long running function that will be called by other developers, you'll use Deferred to return a promise. You'll use the Deferred object to update clients when your function completes (or you want to send a progress signal).
Continuing the analogy, promise is the client side. When you call a long running function, it will return a promise. You will use the promise to be alerted, and execute code, when that long running function completes (or sends a progress signal).

Using Deferred

When to use Deferred

If you are creating a function that may take a long time to execute, it's best to return a promise. This makes it easier for developers who call your function, as they can use the promise events.
One nice thing about jQuery is the developers of the API follow their own best practices. As a result, if you execute an operation, such as an Ajax call, the function will return a promise. If you are creating a function that will be wrapping such a call, you can simply return the promise returned by the function.
For example, consider the following jQuery. We create a function that calls slideToggleslideToggle can take a couple of seconds to execute, depending on how long you tell the operation to take. As a result, it returns a promise, as we saw in an earlier section. Because slideToggle returns a promise object already, we can just use that, rather than creating a Deferred object on our own.
function displayMenu() {
 // just return the promise object
 return $('#menu').slideToggle(500);
}
However, if we are creating a function that will take an unusual amount of time, say one that will be working with graphics, we need will want to use Deffered to return a promise to the caller.

Breaking down using Deferred

The basic steps are as follows.
  1. Create an instance of deferred: var deferred = $.Deferred();
  2. Start your asynchronous operation, typically using a worker
  3. Add the appropriate code to detect success and send the success signal: deferred.resolve()
  4. Add the appropriate code to detect failure and send the failure signal: deferred.reject()
  5. Return the promise: return deferred.promise();
function beginProcessing() {
 // Create deferred object & make sure it's going to be in scope
 var deferred = new $.Deferred();

 // Create our worker (just like before)
 var worker = new Worker('./Scripts/deferred.js');

 // Register the message event handler
 worker.addEventListener('message', function (e) {
  // simple messaging - if the worker is ready it'll send a message with READY as the text
  if (e.data === 'READY') {
   // No UI code
   // Progress notification
   deferred.notify('Worker started');
  } else if(e.data === 'COMPLETED') {
   // processing is done
   // No UI code
   // Completed notification
   deferred.resolve('Worker completed');

   worker.terminate();
  }
 });

 return deferred.promise();
}

Web workers

Introducing Web Workers

Introducing web workers

This section introduces the concept of HTML5 web workers. If you're already familiar with web workers, you're free to skip this section. If you're not already familiar with how web workers are implemented, or just want to brush up, this section is for you!

threading

Threading is a basic programming concept that allows developers to execute code on a separate process. Threading is extremely helpful when working with operations that either require additional processing power, or may take a long amount of time.
Applications typically start with a single thread that is used to execute code and update the user interface. If an operation is long running, and it executes on that thread, the user interface isn't able to be updated, and thus freezes. This provides a bad experience for the user. By using separate threads, you can execute your long running code elsewhere, allowing the user interface to still be responsive to the user.
As mentioned above, threading is an extremly powerful tool. Unfortunately, this tool can easily be mismanaged or abused, leading to degraded performance or potential security risks. This poses a challenge when working with web applications, in which users execute code (JavaScript) without knowing the developer of that code. Allowing threading in a browser could create an undesirable experience for the user. As a result, browsers don't allow JavaScript to use threads.
This is where web workers come into play.

Creating a web worker


Web workers

A web worker is made up of two components, the parent or calling script, and the worker or executing script. The worker runs in an environment similar to a separate thread, and does not have direct access to the calling environment or the UI. Web workers use a messaging system to pass information to and from the worker.

Creating the worker script

To create a web worker, you create a separate JavaScript file. This file will contain the code that will execute in the worker environment. The code in the file will execute immediately when the worker object is created from the calling script. As a result, if you wish to defer execution in a worker, the code will need to be contained inside of a function.

self

The web worker environment provdes an object named self, which represents the worker. self has one function and one event.
The worker provides a function named postMessage that is used to send data to the calling environment. postMessage accepts most data types, including JavaScript objects.
// send a signal back to the calling script
self.postMessage('hello from the worker!');
The worker offers one event, messagemessage is raised when the calling script has sent a message to the worker. message is raised when the calling environment calls postMessage, and thus almost any type of object can be received. The data passed into postMessage is available by using the data property of the event object.
// Receive a message from the calling environment
self.addEventListener('message', function(e) {
    // the data property will contain the data passed from the calling script
});

Calling a web worker


Calling a web worker

To call a web worker, you create an instance of the HTML5 Worker object. Because web workers are a relatively new development, it is a best practice to first check to see if the browser supports web workers. This can be done by testing if Worker is equal to null, meaning it doesn't exist. If Worker is null, you know the browser doesn't support web workers.
// Test if the browser supports web workers
if(Worker == null) {
 alert('You need to upgrade your browser!');
} else {
 // do your work here
}

Creating an instance of the Worker object

The constructor for Worker accepts one parameter, the location of the script it will load into the worker space. Remember, the script will execute immediately, so unless you're certain it's been built to allow you to start it manually, don't create the instance until the last possible momen.
var worker = new Worker('script-location.js');
Similar to what we've already seen, the worker object offers a postMessage method to send data to the worker space, and an event message that is raised when the worker sends a message back to the calling page. The parameter you pass to postMessage is retrieved by using the data property of the event object in the message event handler.
// Register event handler
worker.addEventListener('message', function(e) {
    $('#output').append('<li>' + e.data + '</li>');
});

worker.postMessage('Started!');

Web worker design practices


Designing your web workers

Creating a web worker that accepts status messages

As you may have noticed, the web worker doesn't provide a built-in structure for handling common events, such as start and finish. However, the worker's simple messaging system allows you to easily build your workers to perform the operations you need, and add your own system for managing start and stop events.
Quite frequently, you will want to delay execution of the worker script until the caller sends a signal to start. Remember, when your worker script is loaded, the script is run immediately. You can change this behavior by adding a simple check to the worker for a start message.
Because JavaScript is weekly typed, the data property of the event object passed by the workers doesn't need to be set in advance. You could set it to your status strings, such as START and STOP when you're sending those types of messages, and use a JavaScript object in data when you need to send other payloads.
The script below is one simple implementation of the behavior described, using simple strings for event management. You can use other objects as you see fit, depending on the complexity of your needs.
// worker.js

self.addEventListener('message', function(e) {
 if(e.data === 'START') {
  // Start message received.
  // Begin work
  startWork();
 } else if (e.data === 'STOP') {
  // Stop message received.
  // Perform cleanup and terminate
  stopWork();
 } else {
  // A different message has been received
  // This is data that needs to be acted upon
  processData(e.data);
 }
});

function startWork() {
 // code to start performing work here
 // send a message to the calling page
 // worker has started
 self.postMessage('STARTED');
}

function stopWork() {
 // cleanupp code here
 // stop the worker
 self.postMessage('STOPPED');
 self.close();
}

function processData(data) {
 // perform the work on the data
 self.postMessage('Processed ' + data);
}

Calling a web worker that accepts messages

One of the great advantages to having a worker that's been built to accept status messages, such as start and stop, is it makes it very easy to get everything set up, and then start the worker process when you're ready to have it run.
If you were using the worker that's been designed above, you would use it by following a couple of basic steps.
  1. Create an instance of Worker, passing in the script.
  2. Add the event handler for the message event. Ensure the event handler can respond to the status messages and normal data.
  3. When you're ready to start the worker's work, call postMessage('START');
  4. When you're done, send the stop message by calling postMessage('STOP');
// inside of HTML file

var worker = new Worker('worker.js');

worker.addEventListener('message', function(e) {
    if(e.data === 'STARTED') {
        // worker has been started
        // sample: update the screen to display worker started
        $('#output').append('<div>Worker started</div>');
    } else if(e.data === 'STOPPED') {
        // worker has been stopped
        // cleanup work (if needed)
        // sample: update the screen to display worker stopped
        $('#output').append('<div>Worker stopped</div>');
    } else {
        // Normal message. Act upon data as needed
        // Sample: display data on screen
        $('#output').append('<div>' + e.data + '</div>');
    }
});

// When you're ready, send the start message
worker.postMessage('START');

// Send data as needed
worker.postMessage('sample data');

// Stop worker when you're done
worker.postMessage('STOP');


Saturday, September 14, 2019

Using promises

Asynchronous concepts in jQuery


jQuery promises and deferred

Many operations you perform in both JavaScript and jQuery can take a non-deterministic amount of time.
Some operations, such as animations, take place over a specified amount of time. While you will frequently be responsible for specifiying the amount of time an amination will take, there will be times when the length of time will be variable.
Also, when creating rich web applications, you'll frequently access server resources from your scripts. When you add such functionality, you don't know how long the server is going to take to process your request and return a value.
When those types of operations take place, you don't necessarily care how long they're going to take, but you do need to execute code when they complete. This is where promises come into play.
promise is an object returned by functions in jQuery that take a long or variable amount of time. By using a promise, you can ensure your code executes whenever the operation completes, be notified of its success or failure, or potentially receive updates about an operation's progress.
Besides the built-in functions that return promises, jQuery also offers you a deferred object. A deferred object allows you to create your own long running operations, allowing developers to use the same patterns provided by the promise object, and be updated when your operation completes.
We're going to start our exploration of asynchronous programming in jQuery by introducing promises. We'll then see how you can create your own functions that return a promise through use of the deferred object. As part of this, we will also discuss the concept of a web worker, which is an HTML5 feature allowing web developers to simulate threads in a web browser.

Promises


jQuery promises

promise is a programming pattern in which a long running operation "promises" to let you know when it has completed its work.

Long running operations

Any jQuery function that runs over a long period of time, such as an animation, or communicates with a remote server, such as Ajax calls, returns a promise. The promise object offers several events that are raised when the operation is completed, or if there is a progress update.

Promise events


done

done is raised when the operation completes successfully.
done accepts one or more event handler functions.
The event handler can accept one or more parameters, which will contain whatever data the promise object has returned. For example, when making Ajax calls, you will be able to access the data returned by the server in the event handler's parameter. The data returned is determined by the operation.
// code to obtain promise object
promise.done(function(data) {
 // data will contain the data returned by the operation
});

fail

fail is raised when the operation has completed with an error.
Like donefail accepts one or more parameters. The parameters' values will be determined by the operation.
// code to obtain promise object
promise.fail(function(data) {
 // data will contain the data returned by the operation
});

progress

progress is raised when the operation raises an alert about its current state. Not all operations raise progress events.
Like done and failprogress allows you to specify one or more event handlers, each optionally accepting parameters. The parameter values are set by the operation.
// code to obtain promise object
promise.progress(function(data) {
 // data will contain the data returned by the operation
});

Chaining

You can add done and fail (and potentially progress) event handlers by chaining the method calls as demonstrated below.
// code to obtain promise object
promise.done(function(data) {
 // success
}).fail(function(data) {
 // failure
});

then

then is a single function allowing you to register donefail, and progress event handlers in one call. The sample below is identical to the chaining demonstration above.
// code to obtain promise object
promise.then(function(data) {
    // success
}, function(data) {
    // failure
});

Effective Branching Strategies in Development Teams

Effective Branching Strategies in Development Teams Effective Branching Strategies in Developme...