Triggers
Functions are event driven, which means they run in response to an event.
The type of event that starts the function is called a trigger. You must configure a function with exactly one trigger.
Azure supports triggers for the following services.
| Service | Trigger description |
|---|---|
| Blob storage | Start a function when a new or updated blob is detected. |
| Azure Cosmos DB | Start a function when inserts and updates are detected. |
| Event Grid | Start a function when an event is received from Event Grid. |
| HTTP | Start a function with an HTTP request. |
| Microsoft Graph Events | Start a function in response to an incoming webhook from the Microsoft Graph. Each instance of this trigger can react to one Microsoft Graph resource type. |
| Queue storage | Start a function when a new item is received on a queue. The queue message is provided as input to the function. |
| Service Bus | Start a function in response to messages from a Service Bus queue. |
| Timer | Start a function on a schedule. |
Bindings
Bindings are a declarative way to connect data and services to your function. Bindings know how to talk to different services, which means you don't have to write code in your function to connect to data sources and manage connections. The platform takes care of that complexity for you as part of the binding code. Each binding has a direction - your code reads data from input bindings and writes data to output bindings. Each function can have zero or more bindings to manage the input and output data processed by the function.
A trigger is a special type of input binding that has the additional capability of initiating execution.
Azure provides a large number of bindings to connect to different storage and messaging services.
A sample binding definition
Let's look at an example of configuring a function with an input binding (trigger) and an output binding. Let's say we want to write a new row to Azure Table storage whenever a new message appears in Azure Queue storage. This scenario can be implemented using an Azure Queue storage trigger and an Azure Table storage output binding.
The following snippet is the function.json file for this scenario.
{
  "bindings": [
    {
      "name": "order",
      "type": "queueTrigger",
      "direction": "in",
      "queueName": "myqueue-items",
      "connection": "MY_STORAGE_ACCT_APP_SETTING"
    },
    {
      "name": "$return",
      "type": "table",
      "direction": "out",
      "tableName": "outTable",
      "connection": "MY_TABLE_STORAGE_ACCT_APP_SETTING"
    }
  ]
}
Our JSON configuration specifies that our function will be triggered when a message is added to a queue named myqueue-items. The return value of our function is then written to the outTable table in Azure Table storage.
This example is a simple illustration of how we configure bindings for a function. We could change the output to be an email using a SendGrid binding, or put an event onto a Service Bus to notify some other component in our architecture, or even have multiple output bindings to push data to various services.
Creating a function in the Azure portal
Azure provides several pre-made function templates for common scenarios.
Quickstart templates
When adding your first function, you are presented with the Quickstart screen. This screen allows you to choose a trigger type (HTTP, Timer, or Data) and programming language (C#, JavaScript, F# or Java). Then, based on your selections, Azure will generate the function code and configuration for you with some sample code provided to display out the input data received in the log.
Custom function templates
The selection of Quickstart templates provides easy access to the most common scenarios. However, Azure provides over 30 additional templates you can start with. These can be selected from the template list screen when creating subsequent functions or be selected by using the Custom function option on the Quickstart screen.
- HTTP trigger w/ C#, F#, or JavaScript
- Timer trigger w/ C#, F#, or JavaScript
- Queue trigger w/ C#, F#, or JavaScript
- Service Bus Queue trigger w/ C#, F#, or JavaScript
- Azure Cosmos DB trigger w/ C# or JavaScript
- IoT Hub (Event Hub) w/ C#, F#, or JavaScript
- ... and many more
Navigating to your function and files
When you create a function from a template, several files are created. For example, if you opted to use the Webhook + API Quickstart using JavaScript, the files generated would be a configuration file, function.json, and a source code file, index.js. The functions you create in a function app appear under the Functions menu item in the function app portal.
When you select a function in your function app, a code editor opens and displays the code for your function, as illustrated in the following screenshot.
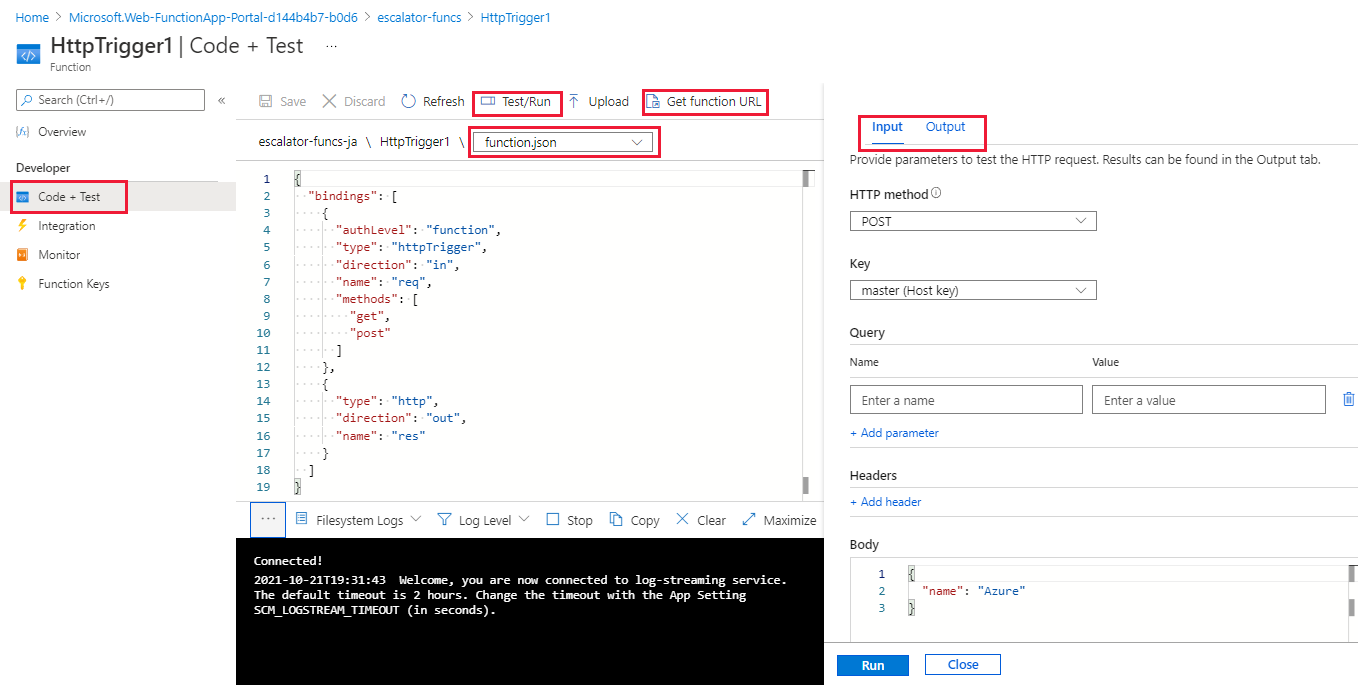
As you can see in the preceding screenshot, there's a flyout menu on the right that includes a tab to View files. Selecting this tab shows the file structure that makes up your function.
Testing your Azure function
Once you've created a function, you'll want to test it. There are a couple of approaches: manual execution and testing from within the Azure portal itself.
Manual execution
You can start a function by manually triggering the configured trigger. For instance, if you are using an HTTP trigger - you can use a tool such as Postman or cURL to initiate an HTTP request to your function endpoint URL, which is available from the HTTP trigger definition (Get function URL).
Testing in the Azure portal
The portal also provides a convenient way to test your functions. On the right side of the code window, there is a flyout tabbed navigation menu. This menu contains a Test item. Expanding the menu and selecting this tab gives you another way to execute your function and view the result. When you click Run in this test window, the results are displayed in the output window, along with a status code.
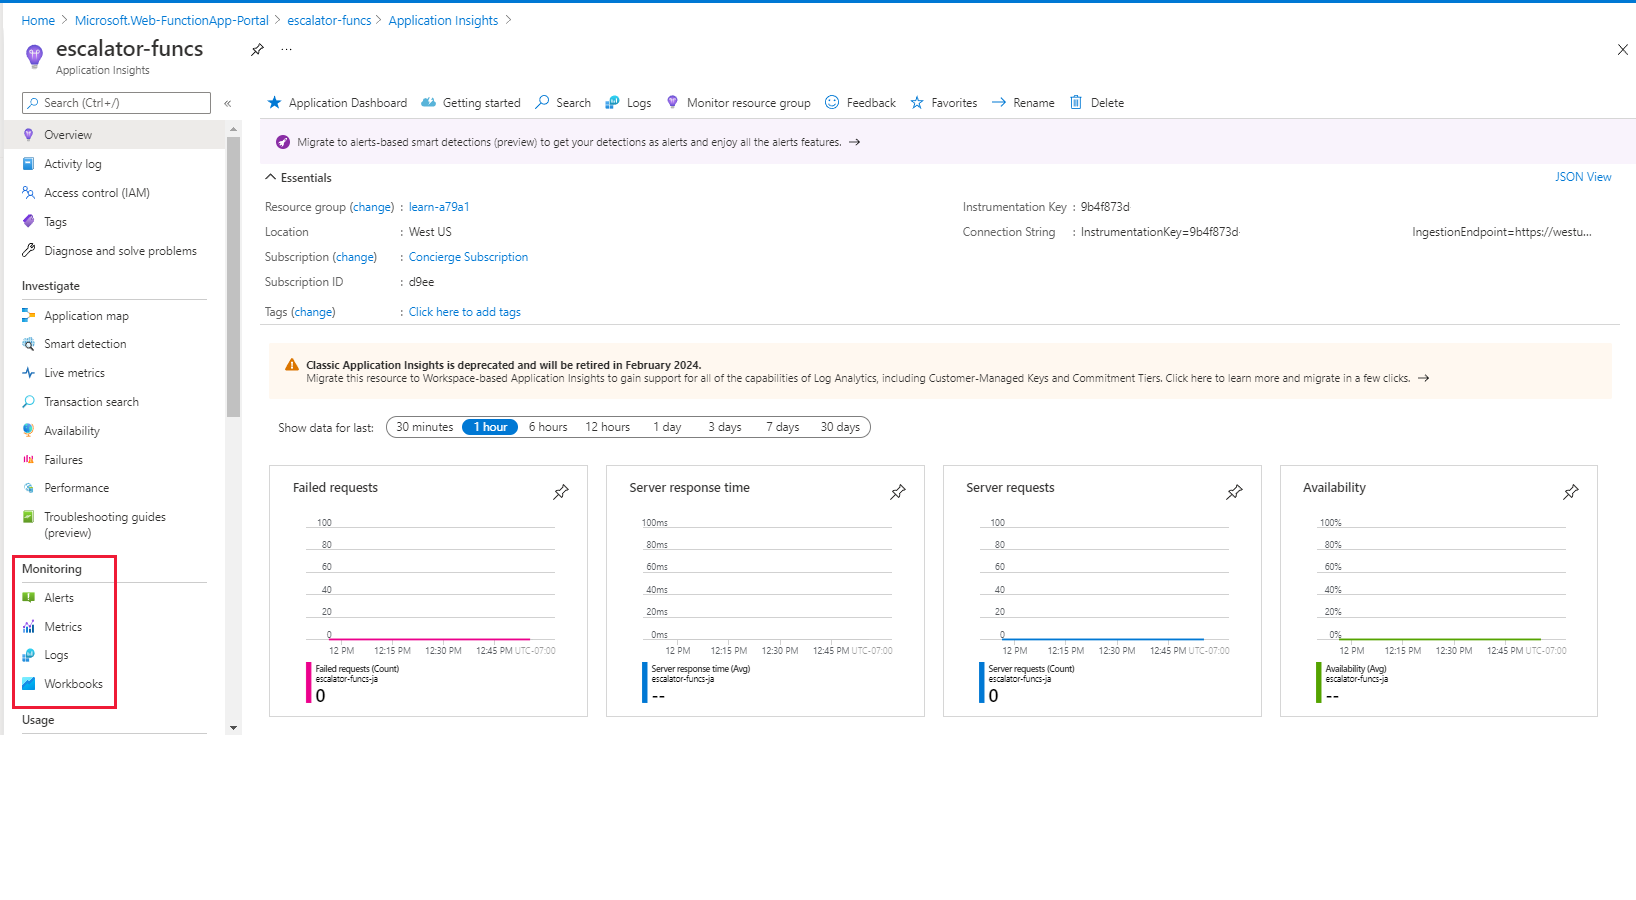
Monitoring dashboard
The ability to monitor your functions is critical during development and in production. The Azure portal provides a monitoring dashboard available if you turn on the Application Insights integration. In the function app navigation menu, once you expand the function node you'll see a Monitor menu item. This monitor dashboard provides a quick way to view the history of function executions and displays the timestamp, result code, duration, and operation ID populated by Application Insights.
Streaming log window
You're also able to add logging statements to your function for debugging in the Azure portal. The called methods for each language are passed a "logging" object, which may be used to log information to the log window located in a tabbed flyout menu located at the bottom of the code window.
The following JavaScript code snippet shows how to log a message using the
context.log method (the context object is passed to the handler).
context.log('Enter your logging statement here');
We could do the same thing in C# using the
log.Info method. In this case, the log object is passed to the C# method processing the function.log.Info("Enter your logging statement here");

No comments:
Post a Comment