Working with Git Branches Locally
In the previous lesson, we introduced the basic concepts of Git - creating a repo, staging a file, committing changes, checking status and the concept of the master branch. All our work was done using this single, master, branch. In a team, or large software project where multiple features are being worked on simultaneously, we use the concept of branching to enable us all to work on the code base at the same time efficiently and with confidence. The concept of a branch in source control is similar to that of its botanical cousin, the branch of a tree. Merriam-Webster, for example, describes a branch as follows:
"... a secondary shoot or stem (such as a bough) arising from a main axis (as of a tree)"
In our world of bits and bytes, we map these concepts as follows:
tree -> repomain trunk -> master branchstem -> (feature) branch
The following diagram illustrates the concept of branching. Here we have a main trunk, called master. That's our master branch. When we want to work on a body of code safely away from master, we create a feature branch which is a snapshot of master at the time we created it, plus the changes we are making. When we are happy with the feature and are ready to commit to shipping the code, we put the code into master and remove the branch. This process is repeated throughout the development life cycle.

Branching is not a new concept in the world of version control systems but it is easy to work with in Git. As we'll see shortly, branches are cheap to create and merging the changes back into your main branch is relatively straightforward. Let's start exploring!
- The first command to learn is
git branch. It tells us what branch we are currently on. Let's go back into the local-repo example from the previous lesson and typegit branch. If all goes well, it should display the following:
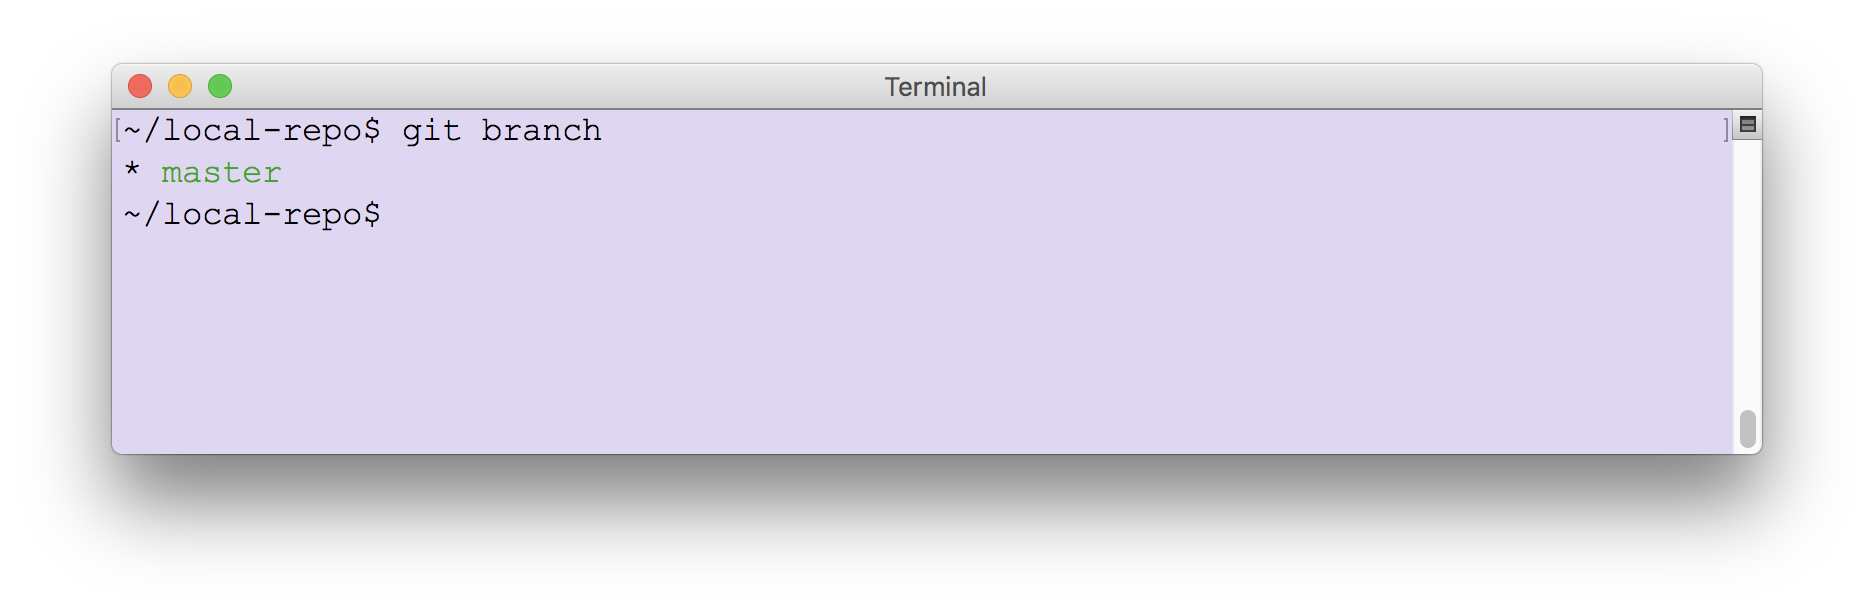
As expected, the command reveals that we have one branch at the moment, called master. The asterisk (*) tells us that we are currently on that branch.
- Switching between branches in Git is called checking out a branch and we switch using the
git checkoutcommand. To create a new branch, we run the command with the-bargument. Let's try that with the following command:
git checkout -b new-feature
The resulting message in the console states Switched to a new branch 'new-feature'. We can confirm that by running
git branch again.
As we see from the preceding screenshot of the console, the asterisk is now in front of the new branch we named new-feature meaning we have switched to that branch. But, what does all of this mean in terms of the files we already have in the repo? Well, if you list everything in the repo now, you'll see the same files as you would expect to see in the master branch. If you are using
local-repo from the preceding exercise, the directory will contain one file, hello.txt.- Create a new text file and call it new-feature-file.txt.
- List all files in the directory (
lsin macOS or Linux,dirin Windows). You should see the file listed. - Let's stage this change to our branch as follows
git add new-feature-file.txt
- Check the status of our branch with a call to
git status
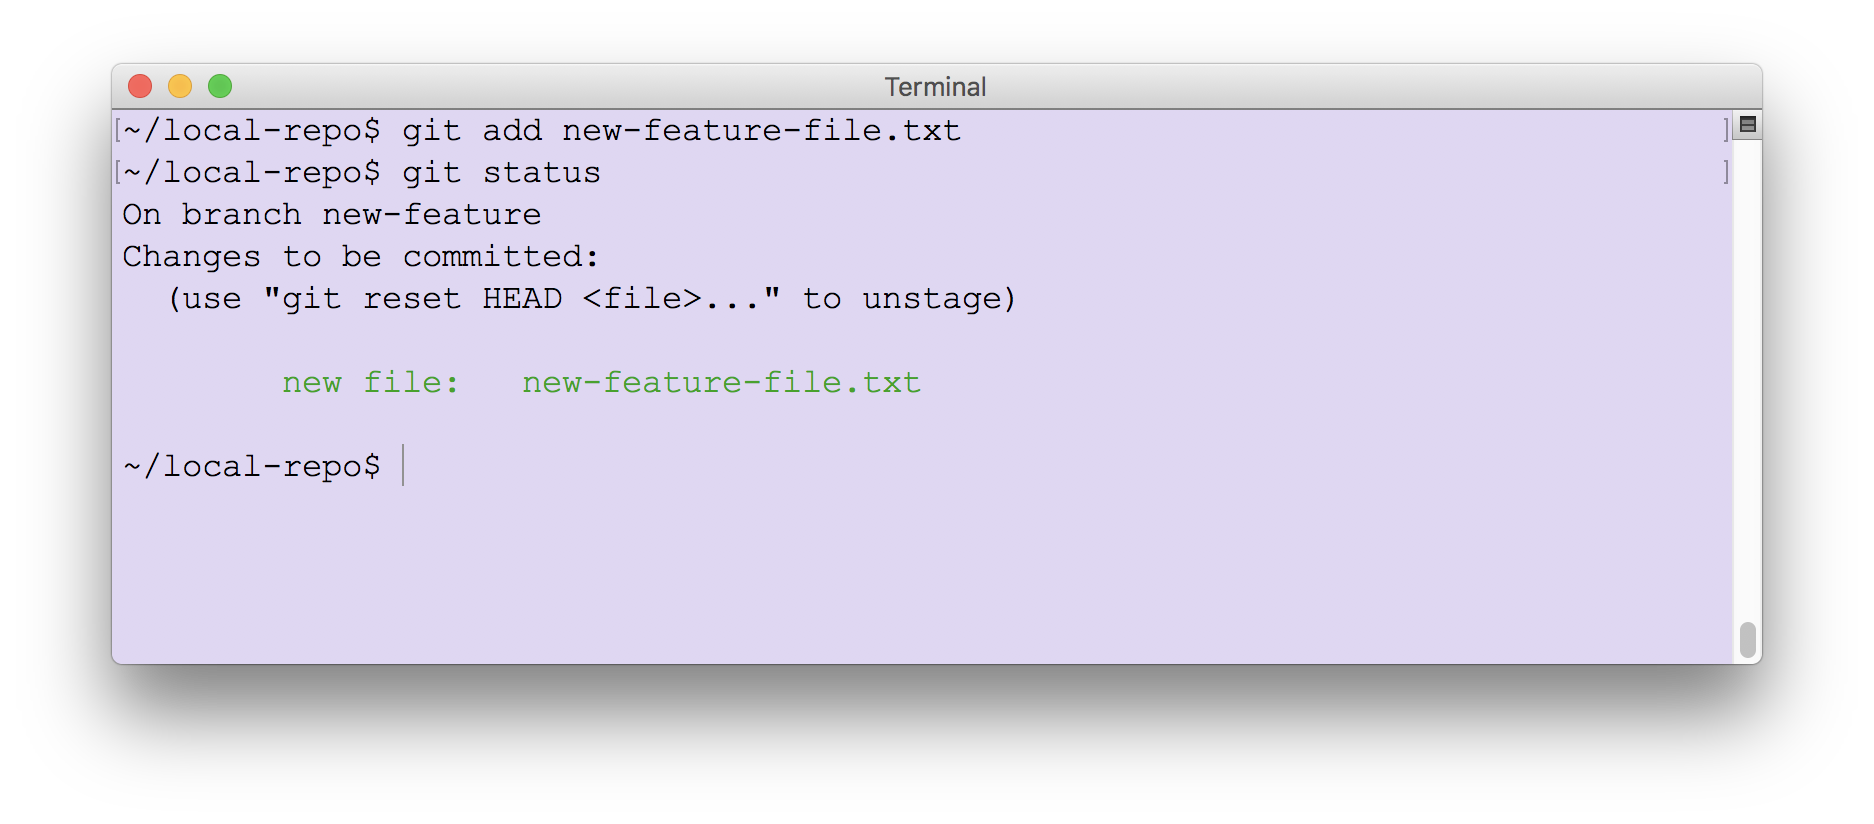
The result shows us that we are on the branch new-feature and have staged one file.
- Commit this change to our branch with the following command:
git commit -m "add new file"
- With our changes committed to the new-feature branch let's switch to master with
git checkout master - List all files in the directory (
lsin macOS or Linux,diron Windows). The result may seem surprising at first:
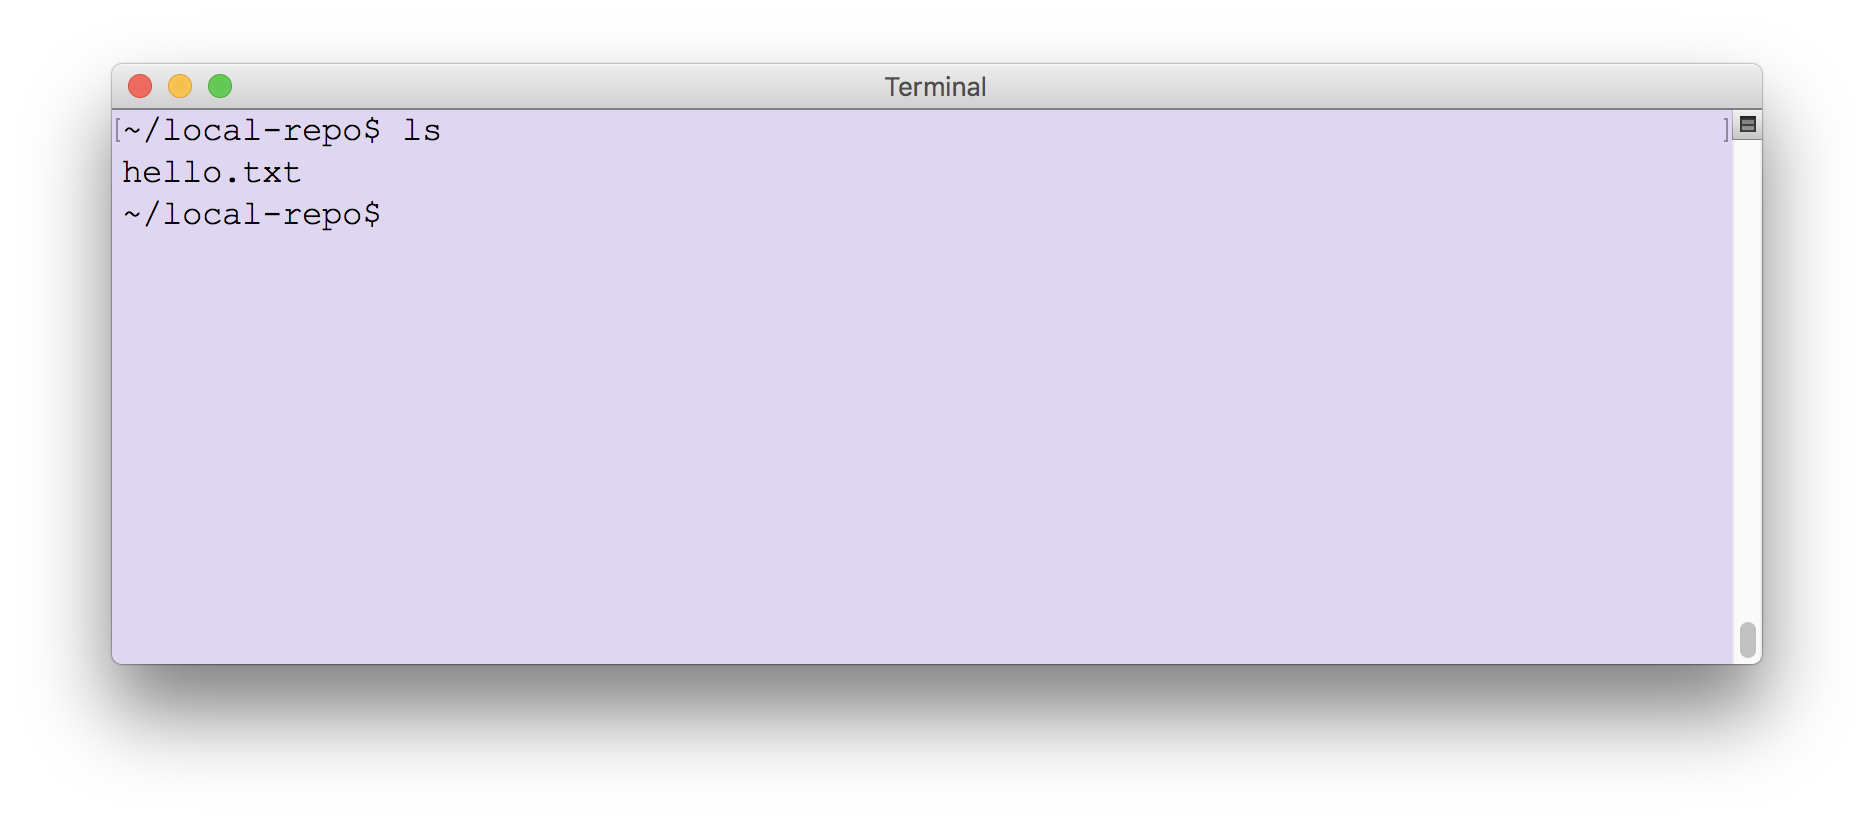
It seems like our new file new-feature-file.txt is missing from the directory!
So, what is happening here? Firstly, do not fear! Switch back to the feature branch using the command
git checkout new-feature and list your files again. Your new-feature-file.txt is alive and well.
This simple example demonstrates the true power of a branching strategy. It shows that we were able to introduce new changes (represented by the new-feature-file.txt file) in complete isolation of the master branch. It demonstrates how easy it is to switch between branches. Once we have completed this feature, we want to bring those changes over to the master branch. This process is called merging, and we'll do that next.
- Confirm you are back on master with the
git checkout mastercommand. - To see what branches are not merged with master, type the following command
git branch --no-merged
This check will list new-feature as a branch that has not yet been merged with master. Let's do that now.
- On the command line, merge our branch using the following command. Note the
-mswitch? That's the same switch used in the commit operation and allows us to add a comment to our merge.
git merge --no-ff new-feature -m "merge new-feature branch"
If you run the preceding command without the-mswitch you will be prompted to add a comment before merging.
- While on the master branch, list all files in the directory and confirm that new-feature-file.txt is now visible.
- Typically, once we have merged a branch's features into master we remove the branch. This can be done with the following command:
git branch -D new-feature
The following screenshot shows the output from the
git branch -D command telling us that the branch has been deleted. It also shows that git branch reveals that we are back to where we started with one branch, master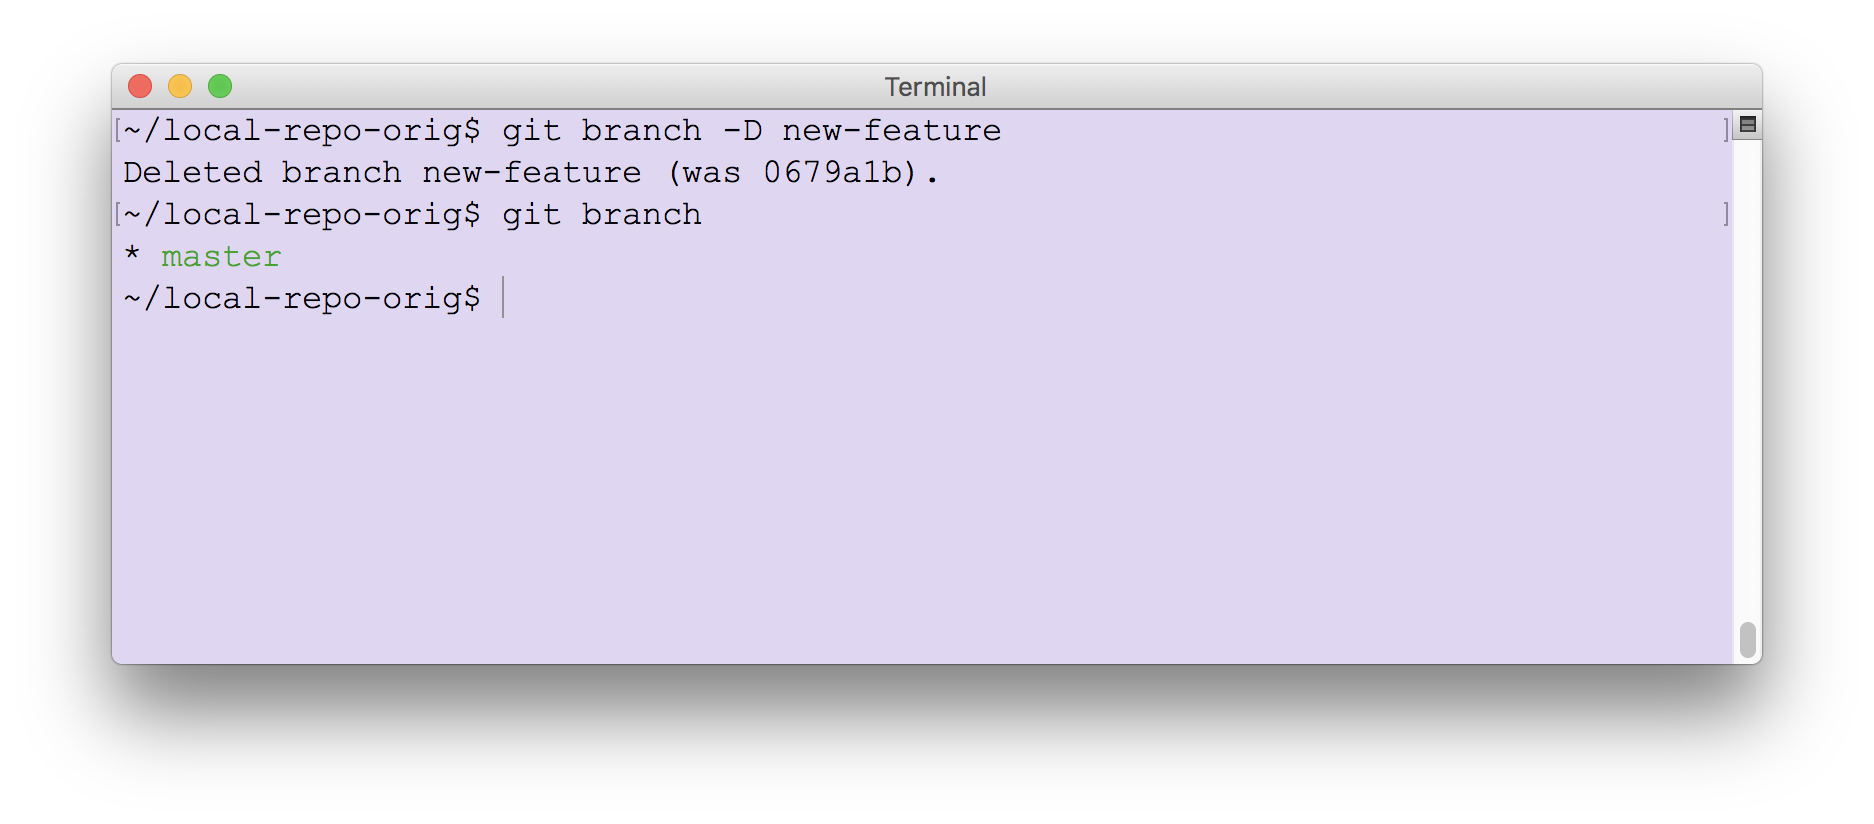
In the following diagram, we summarize the operations that were performed in this lesson.
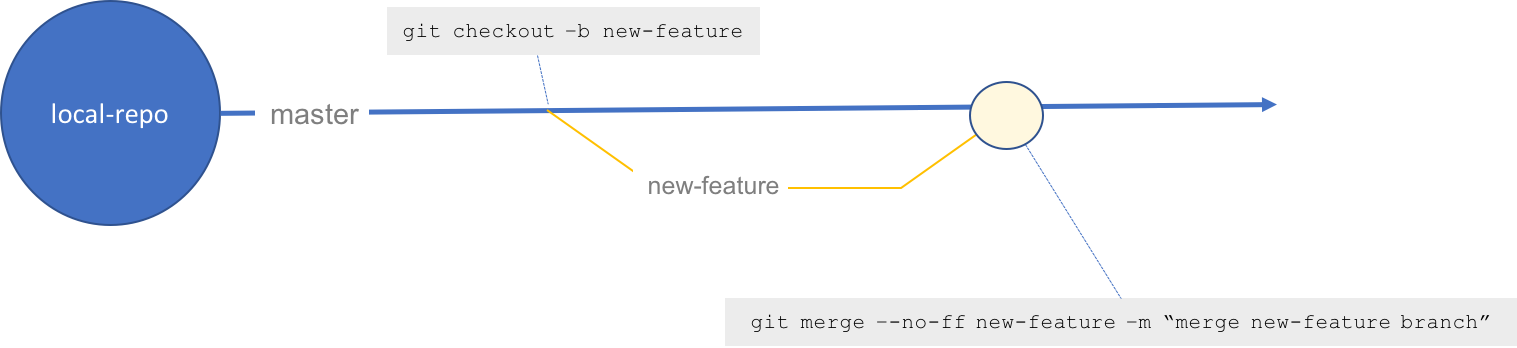
Here we can see that we branched off from master to created a new branch called new-feature. We then made changes in that branch and, when we were finished with the changed, we merged then back into master.
In the previous two lessons we introduced the core concepts of source control and Git. This exploration was limited in the following ways:
- So far, we have demonstrated everything using very simple text files. However, since all modern code is stored in text files, it should be easy to see how these concepts apply to text files full of code.
- Everything you have done so far has been local on your machine. This is a great way to learn these concepts but, when it comes time to work on a shared codebase, you'll need to understand how to apply all this knowledge to a remote codebase.
The next step in our journey is to play with remote code and to do this, we'll introduce the very popular Git-based code hosting platform called GitHub.
Working with Git and a Remote Repository
So far, we have worked with remote repositories directly on the GitHub site. In the preceding examples, we added a text file directly to the master branch of the repo in GitHub, all using the GitHub UI. The real power of managing our source using a service like GitHub that runs on Git is that everyone on a team can grab a snapshot of the code locally, work on an update and then push back to the remote server. Let's see that in action next.
This lesson assumes you have a GitHub account. Please see A Lap Around GitHub for information on how to obtain a free GitHub account.
Apart from our brief tour of GitHub in the preceding lesson, nearly everything we have done with Git and source control was local to our machine. So far in this course, we practiced the following Git commands.
git status- checks the state of a repogit add- stages updatesgit commit- commits updatesgit checkout- switches branchgit branch- lists existing branchesgit log- shows commit history
All of these commands operate on a local copy of a remote repo or standalone repo you created locally. In this lesson, we introduce a small set of commands to help us work with a remote repo. But first, let's talk about remote repositories.
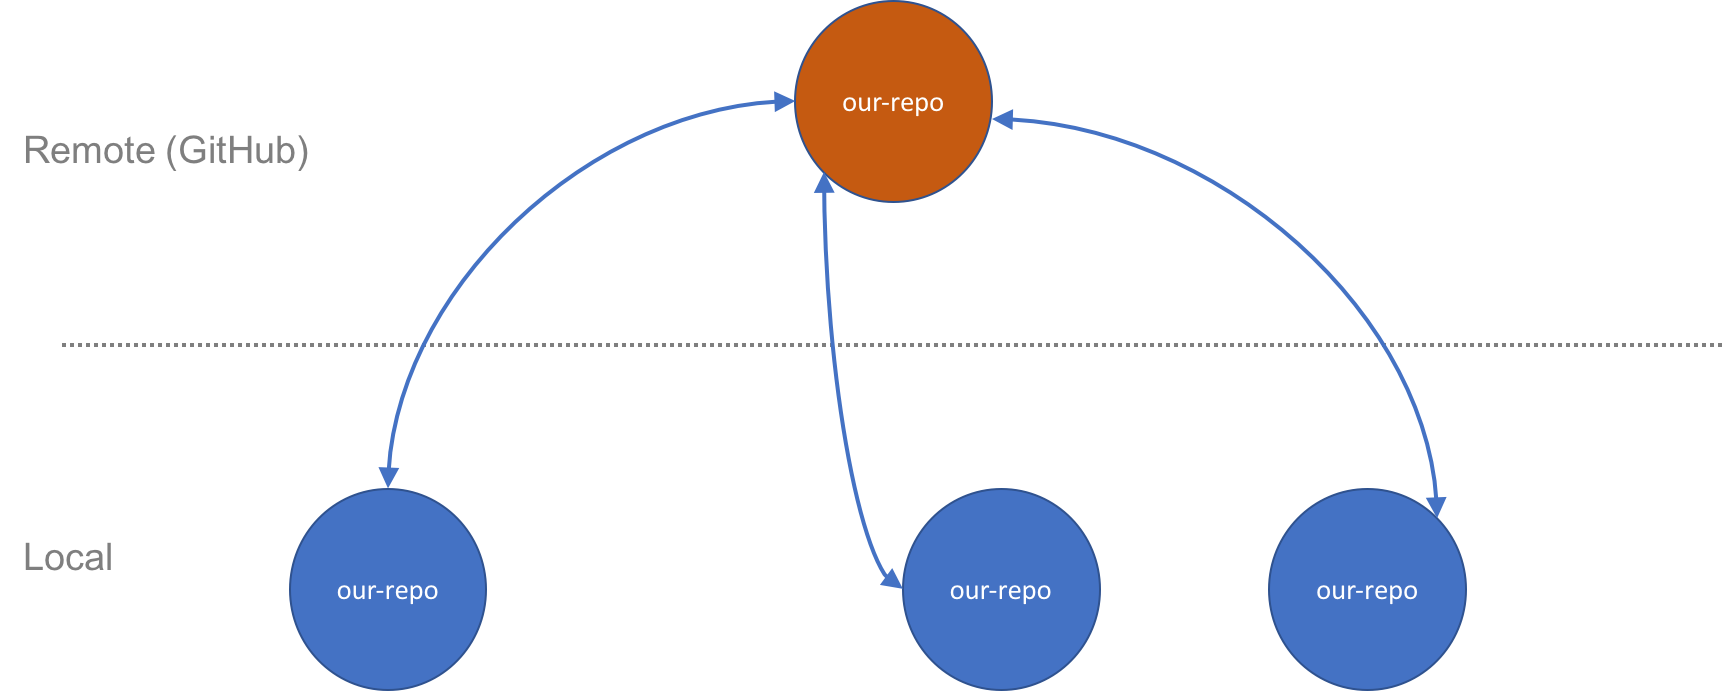
A remote repo is a Git repository that is created on a server. Similar to a file share, it is a way for multiple people to access the repo. In a software team, each developer can reach the remote repo in order to make changes. While it is possible to go to the server and make changes against the repo directly, typically we pull the repo down locally to our machine, make changes and push back. This is illustrated in the following diagram. Here we have a repo called our-repo hosted on GitHub. Each team member does a clone of this repo to their local machine. They make changes in their local copy of the repo and the remote master is kept up-to-date by the developers performing a push of their changes from the local copy to the remote. Of course, with so much activity going on in the code base the developers need to keep their local clone of the repo up-to-date with all changes that everyone pushed to the server. They do that by performing a pull at regularly intervals and merging if necessary. We can demonstrate this basic flow using GitHub and a remote repo in this lesson.
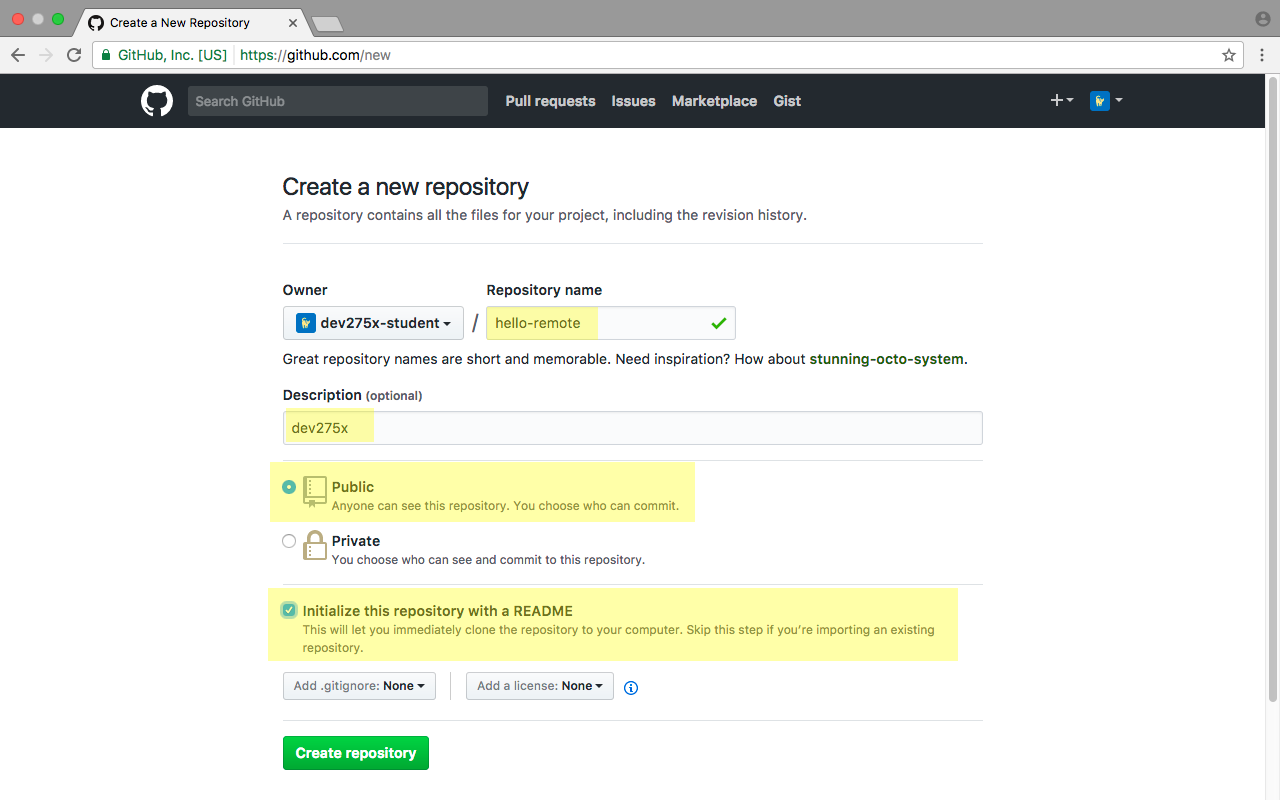
- In your GitHub account, create a new repo with the following parameters:
- Name = hello-remote
- Description = dev275x
- Public or Private: Public
- Initialize this repository with a README: check
- On the main page of your newly created repo on GitHub select the Clone or download drop down button and press then select the copy to clipboard action as highlighted in the following screenshot.
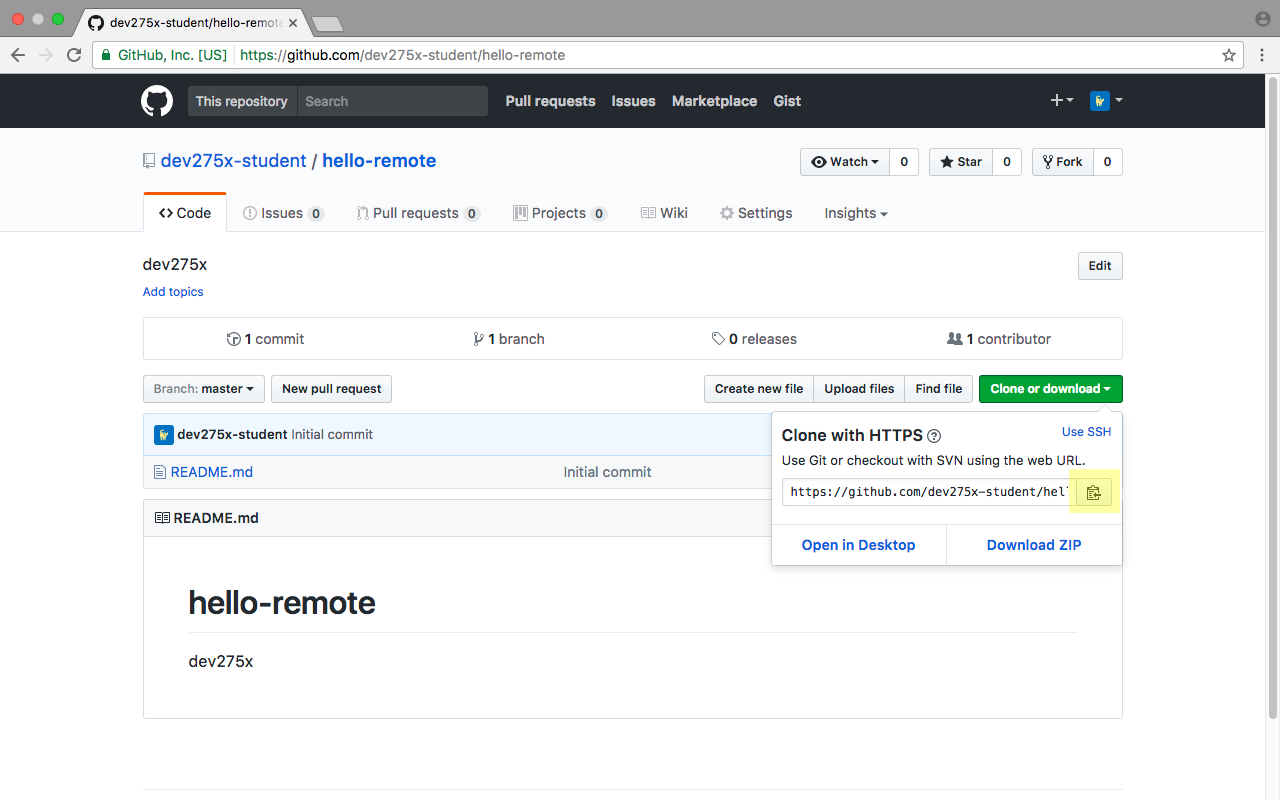
This operation copies the URL for your repository to the clipboard.
- At the command prompt or terminal window of your machine type the following command
git clone [URL]
Replace
[URL] by pasting from the clipboard. Alternatively, replace [URL] in the command above with a URL in the format https://github.com/<your_github_username_here>/hello-remote.git.
In your command shell, you should see output similar to the following:
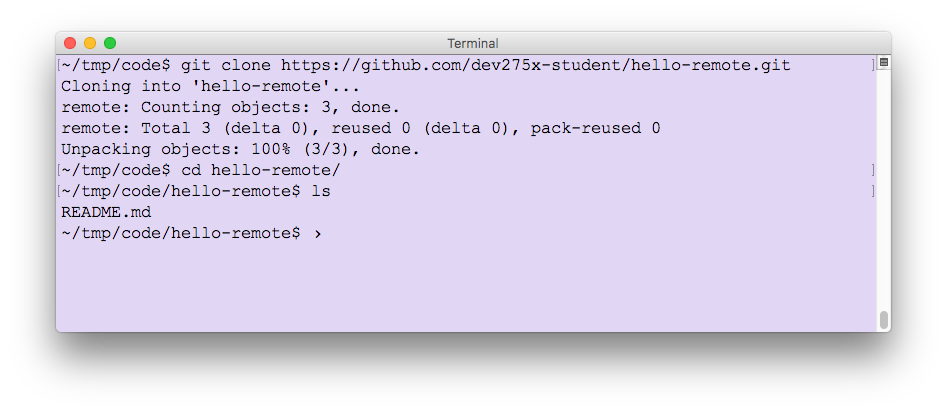
The clone operation copies the remote repo to your machine in a folder with the same name as the repo, as shown in the preceding screenshot.
- Navigate into the hello-remote directory. It should contain the single file README.md and, of course, the usual hidden .git folder.
- Let's check on the status of our repo with
git status
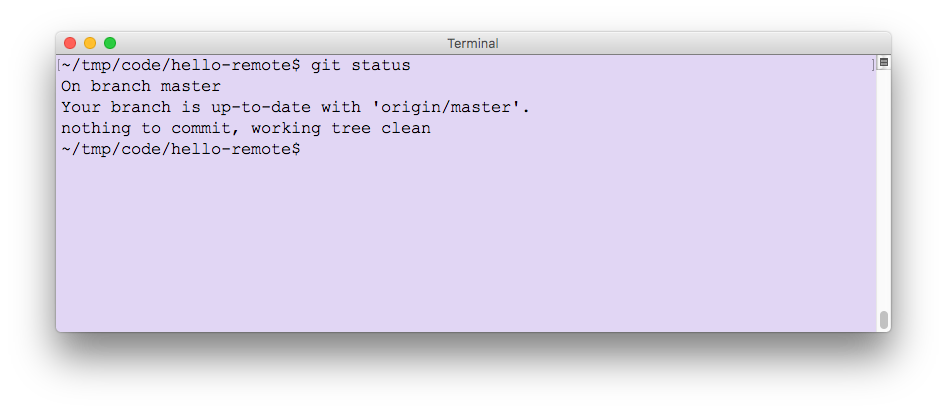
It looks like we are working in the master branch. We are also told that we are up-to-date with 'origin/master'.
origin/masteris the clone of the remotemasterbranch on your machine. So, when we read "Your branch is up-to-date with 'origin/master'" it is really telling us that the branch is up-to-date with the clone of master from origin.
- Still in our local clone of the repo, let's add an empty text file called demo.txt. We'll add some content to it in a while.
- Stage the new file with
git add demo.txt
- Commit the new file to master with the command
git commit -m "add a text file"
- Check the status of our local repo with
git status
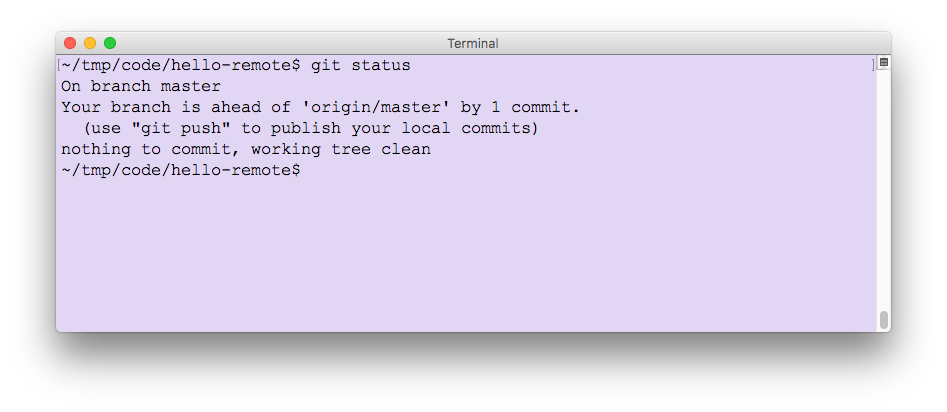
Here we can see that Git tells us we are ahead of 'origin/master' now by one commit. That makes sense, since we've made a change locally and haven't sent it to the remote repo. Let's do that now.
- To send our updates to the remote repo we use the push command or, to be more specific:
git push -u origin master
The
-u parameter tells Git to set origin/master as the upstream repo and means we don't have to keep specifying it from now on.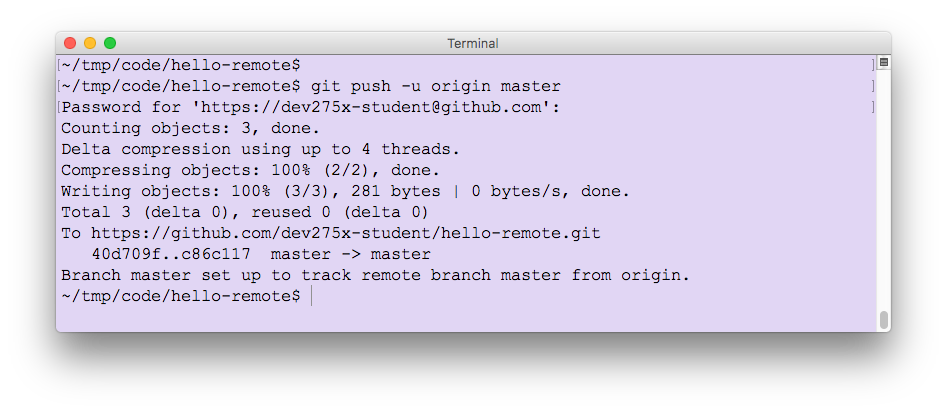
As we see from the results of the push operation our changes were pushed to the remote repo on github.com. Once again
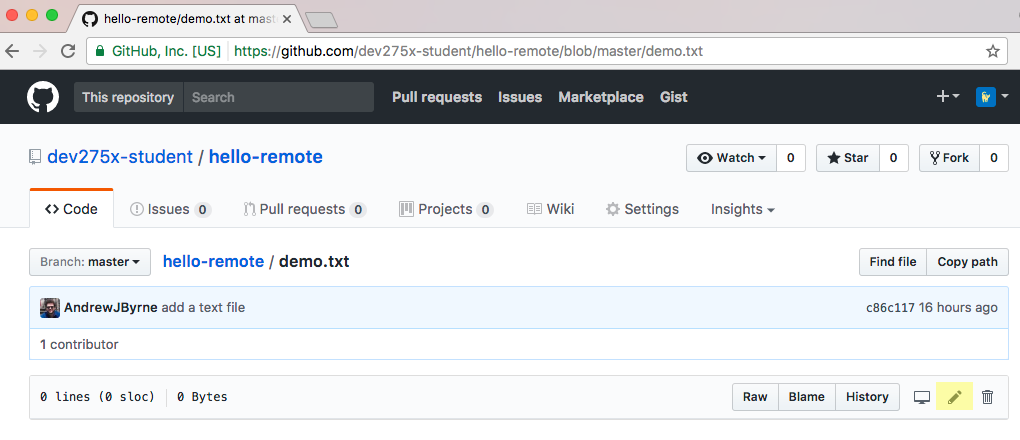
git status reveals that we are in sync, or up-to-date with 'origin/master'. Let's see what happens when changes are made on the server.- Browse to your repo on GitHub. Confirm that the file you added is in the repo, as shown in the following screenshot.

- Select demo.txt in the list and then the pencil icon, highlighted in the following screenshot.
Since this is a text file, we can edit inline in the browser.
- In the <> Edit file window, enter some text into demo.txt. Here's an example:
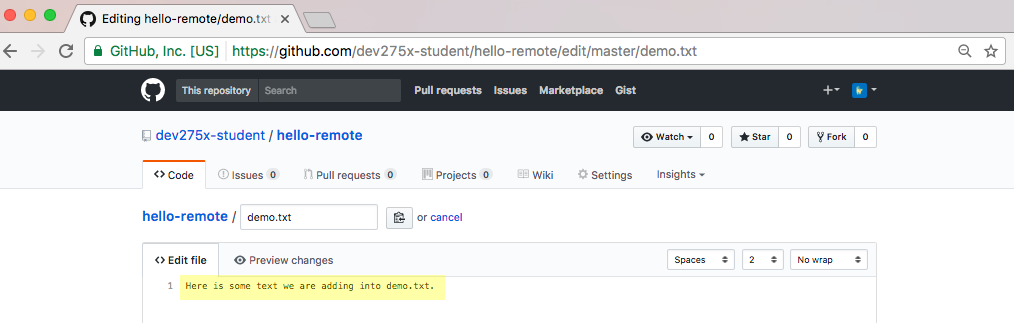
- Scroll to the bottom of the edit page and select Commit changes. The default commit message ("Update demo.txt") is sufficient here and there is no need to change it. At this point we have committed an update of demo.txt to the repo. However, we did this on the server, so let's see the state of our local repo.
- From the command line use
git statusto check on the status of our local repo. You should see the messageYour branch is up-to-date with 'origin/master'. This might seem surprising at first but, remember early in this lesson we said that this really means that the branch is up-to-date with the clone of master from origin. So, how do we check to see if there were any changes on the server? For that, we'll usegit fetch - On your command line, enter the following command:
git fetch origin
As the following screenshot illustrates, the
fetch command essentially updates your remote-tracking branch, in this case origin. Performing a git remote -v at your command prompt will show that origin is pointing to your remote hello-remote repo on github.com. So, fetch is checking for updates on that remote repo.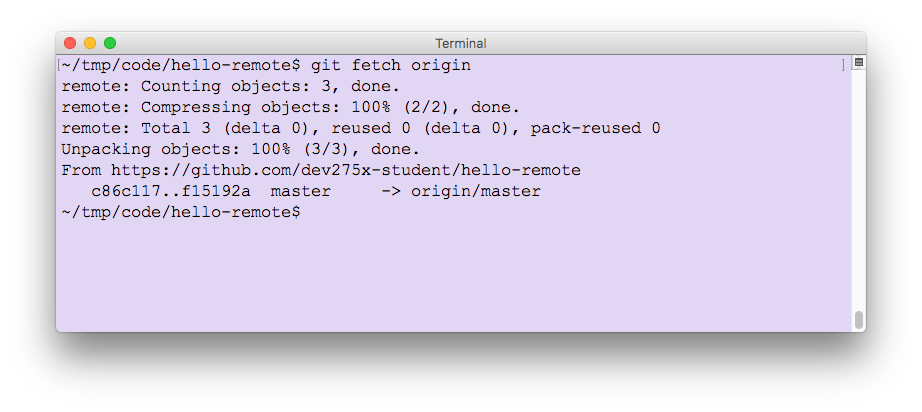
- At the command line, check your local repo state after the
git fetchwith a call togit status
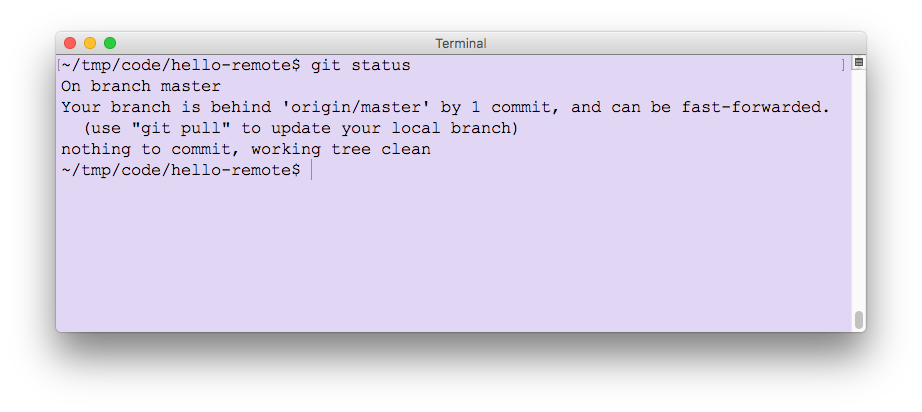
As expected, once
git fetch grabbed the latest changes and info about our remote repo, git status reveals that the local repo is actually behind by 1 commit, namely, that edit we did on the server. If we open demo.txt in our favorite editor at this point, it will not contain the edits we made. To get those edits into our local copy, we need to use another command.- At the command prompt, type the following:
git pull
This command incorporates the changes from a remote repository into the current branch. Since, we didn't specify the remote repository from which to incorporate changes, it uses the default value which is origin, i.e., our remote repo.
Behind the scenes,git pullis actually agit fetchfollowed by agit merge
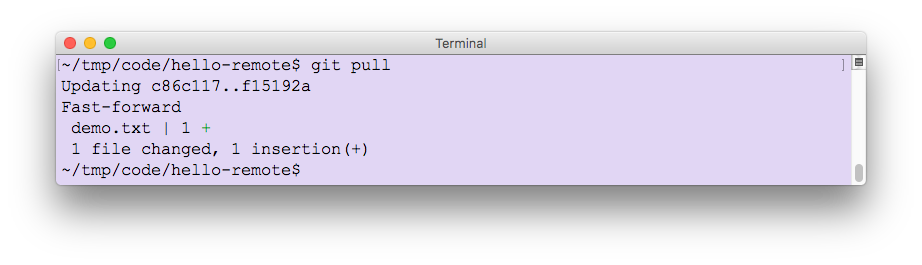
- Open demo.txt in your favorite editor and verify that the changes you made on the server are now available in the local copy.
At this point we have pulled down edits made to our file from the server. You may have guessed by now that the command to send changes from our local copy to the server is a
git push.- Edit demo.txt, save the changes and then commit the changes locally using the following commands.
git add demo.txt
git commit -m "Update from local copy"
- A call to
git statusreveals that we are now ahead of the remote repo by one commit. Notice that Git also tells us what command to run next in order to publish our local commits.
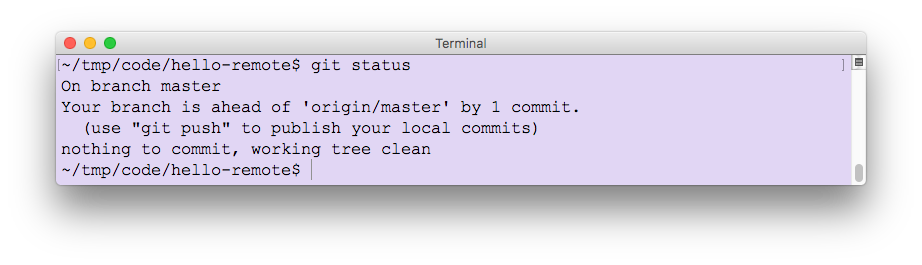
You should get into the habit of syncing with your remote repo manually by performinggit fetch originbefore checking status. That will reveal whether more changes have happened on the server since you last synchronized.
- On the command line, publish your commits with the following command:
git push
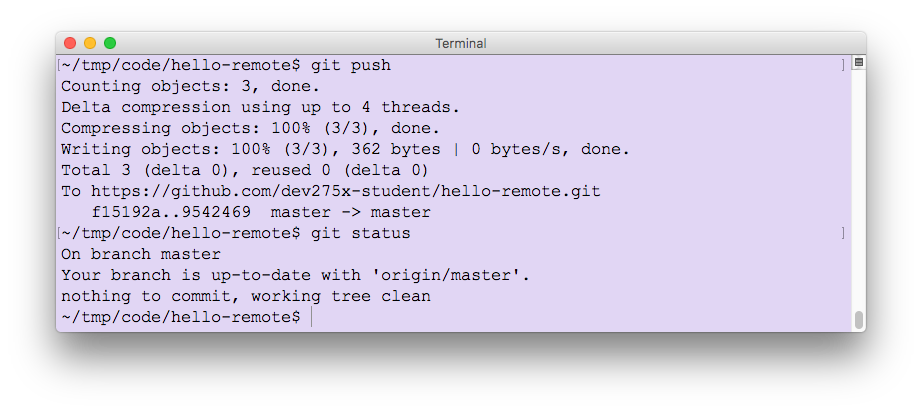
There you have it! You have successfully round-tripped a file demo.txt with edits done on both the server and your local copy, all managed with the
git fetch, git push and git pull commands.
Ref: https://courses.edx.org/courses/course-v1:Microsoft+DEV275x+2T2019/courseware/94699bedb4d14abab4374445ddd2efb2/7f894a1fec5c4421a8499775f0f26f6d/1?activate_block_id=block-v1%3AMicrosoft%2BDEV275x%2B2T2019%2Btype%40vertical%2Bblock%4095303d11f841403c906a780814bc518a
ReplyDelete